.avif)
DealRoom Pipeline Video Tutorials
These videos go over DealRoom's different pipeline features from an admin's point of view.
1. Pipeline Overview
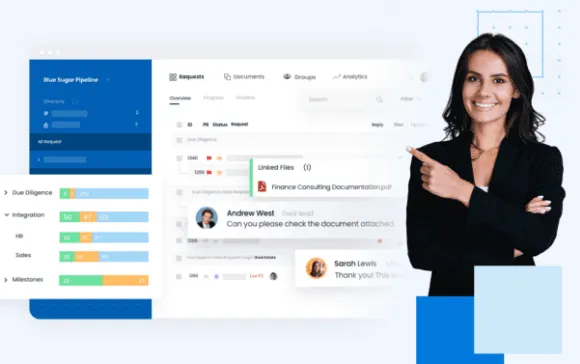
This is a high-level walkthrough of the pipeline inside DealRoom. The pipeline is a trackable overview of all the deals or projects that have rooms. Once you create a deal, a deal card will show up in your pipeline where you can click to access the project management and data room functionality, as well as track high-level deal metrics using custom fields.
Search for a deal by name or click on the name of your pipeline in the upper lefthand corner. A dropdown of other deals or pipelines that you have access to will appear. From the members tab view all the contacts who are members in your projects and send out mass notifications to users.
Custom charts and graphs are easily built out from the reports tab, and customize/adjust your dashboard from the settings tab. Everything is completely customizable, from how deals are grouped in phases, to the custom fields you would like to use to capture deal data. The dashboard is the comprehensive tool to manage all of your projects.
2. Pipeline General Settings
Completely customize how your pipeline is set up by using your options under the settings tab. You have the option to work with your customer success manager during onboarding to put together an ideal set up for your organization or you can set it up on your own. You’re able to adjust these settings at any point so the platform can adapt and grow with your process.
Starting with the general tab, create the phases you want your deals to live in and move through. Each deal card will be tracked for the amount of time it stays in each phase
Adjust your background color and how you want deals to be organized within each phase by the custom fields established in the custom fields tab.
Also, use an established custom date field to define a close date to be reflected in your timeline view.
View the total amount of data you’re using across all your rooms by clicking on view storage usage.
3. Pipeline Custom Fields Settings
Set up custom fields to track information and details for each deal. Create as many fields as you like and set their title and field type. These fields will show up on your deal card and can be used to define other functionalities on your dashboard such as the timeline close date. The custom fields are also used to create custom reports.
Member custom fields can be set up to track additional information about members that log into the platform. This will be shown in your members tab as additional fields for each contact.
The reports custom fields are the fields you want each group to be required to fill out from their reports button inside the room. Enable these fields for groups from the groups tab and see all the submitted reports from the reports tab on the deal card view.
4. Pipeline Authentication Settings
You can require all users to use two-factor authentication when logging into DealRoom. By requiring this from inside the room on their settings tab, each user can dictate how they would like to set their second authentication for their account, including options such as text code or an app authentication.
5. Deal Pipeline Access Settings
Grant access to the pipeline for certain users. When you select grant deal pipeline access, you will be prompted to enter the user's email address and select their level of access.
- User: allows the user to view the pipeline and deals that they are an administrator for, as well as access create reports, phases history, and viewing activity
- Manager, allows all user permissions (listed above) and the ability to create deals
- Admin, allows all user and manager permissions (listed above), as well as access to all settings and the ability to change others' pipeline access. With these access level, you can also choose to give an individual access to basic pipeline settings.
These levels of access are defined on this page and all members with pipeline access are listed as well. Click on a member listed to change their level of access.
6. Pipeline Deal Trash Settings
Any deals that are deleted from inside the room, will still be accessible for pipeline admins from the deals trash. From here, you can restore or permanently delete the deal and all data. Any deals in the trash are still counted as active data until you permanently delete them.
7. Creating a New Deal and Navigating a Deal Card
Click new deal to create a new room and deal card for your project. You can type in the name you want and then either choose to open the room "blank", choose from one of our pre-populated templates, or copy the structure of an existing room. Then click create and the room will show up in your unknown phase, where you can then move it up to the appropriate phase you have set up.
Once you have your deal created, click into the card to manage additional properties. From details, click the custom fields listed to update any information in your custom fields for this deal.
Notes allows you to leave notes for others to view, but only those who have access to this deal in your pipeline.
Groups lists all the members who are in the room for this deal and allows you to turn on the group reporting functionality. Any changes you wish to make to the group reporting functionality can be done in the pipeline settings.
One you’ve turned on reporting for groups, you can view and export all reports submitted by each group from the reports tab.
Phases lets you plan out how long a deal will be in each of your phases, as well as track the actual amount of time it’s in each phase. You also have the ability to leave comments.
This is all the functionality available from the deal card view.
8. List, Table, and Timeline Views + How to Create a New View
You can view deals in the list format, which lists all the deals in their card view, change to a table view for easy exports to Excel, or view deals from the timeline perspective to keep track of start dates, end dates, and how projects are progressing through phases.
Create and save custom views by applying filters from your custom fields. Adjust view options to include the field columns you want to view and then hit save. These views can be saved for yourself or your team and pinned to the top for easy access.
Export all deals and custom field information to Excel, or import new deals with custom field information already as an input from the actions button.
9. Pipeline Members Tab
View all members and the rooms they have access to, along with additional credentials, from the members tab. Click the room drop down to see the name of the room and group they are apart of in that room. Easily filter by a specific room and group to bring up those members.
Click add new member to add new or existing members to rooms and groups within rooms. They will receive an email notification that they have been added to that room or an email to log in and create their account.
Create an announcement that will get sent as an email notification to users in a specific room and a specific group. This will override their existing notifications and will come from the DealRoom system.
10. Pipeline Reports Tab
The reports tab allows you to view report metrics and create custom reports on all of your deals including deal history, phases tracking, and the dashboard.
History allows you to see information listed for your deals on a certain date. Easily filter by the date you want and view what information was posted for each custom field for each deal on that day.
Phases will track how many days each deal has spent in each phase and how it has moved through your phases.
Dashboard allows you to create custom charts and graphs based on calculations using your custom fields. Click add view to create a name for your report and use the pivot table to drag and drop your custom fields to be used in the report. Select the type of report that you want created along with the type of calculation.
Once created, you can edit the chart by clicking on the title and export it as an image. Use the date filter to bring up what each report looked like on a specific date.
11. Pipeline Notifications and Help Tab
The bell icon is your notifications tab. Here you can view all of the notifications you’ve received across all of the rooms you are in. Easily filter by room to bring up all of the notifications for a certain room. You are also able to create an announcement from this tab as well.
The question mark brings up the help resources available to all users. Live chat is recommended if you have a question while using the platform and there’s a business hour phone line you can call. Here, you will also find additional training resources and help guides along with frequently asked questions.
To log out of your account, simply click your profile icon and select log out.